1. Introduction
Jump to:
No content available.
Welcome!
We are proud to introduce our NCTI standard / CRM client for Windows. The client is optimised for your telephone system. NCTI standard / CRM for Windows has been designed to make your phone easier and more convenient to use. It can do this in a number of ways as with available CRM / ERP systems and this document will show you how.
The purpose of this manual is to provide detailed insights into installation and usage of the clients to make communicating via the phone as comfortable and easy as possible.
We hope you enjoy using your NCTI premium / CRM for Windows.
Subject to alterations
Version 2 / 07/2019 (EN)
| Type | Icon/Character | Description |
| NOTE
CAUTION
WARNING | NOTE: Information that is useful but not critical to the reader.
CAUTION: Tells the reader to proceed with caution.
WARNING: Stronger than CAUTION; means "don't do this" or that this step could be irreversible, e.g., result in permanent data loss. | |
| TIP |
| Useful tips that provide additional information. |
| Procedure | 1. 2. 3. | Procedures are numbered steps to perform an action, where the order of the steps is relevant. |
| Result of procedure/action | ⇒ | Indicates the result of an action//procedure. |
| Lists | • • | Used for listings and items where the order of steps is irrelevant. |
An error "NFON" on the telephone display of the Panasonic KX-UTxxx.
After a call "NFON" is shown on the display. Dialing of call numbers can be done, yet "NFON" is displayed after each further call.
By pressing the Cancel key, your diplay will be reset.
Due to security guidelines this is the only way we can troubleshoot this error at the moment.
hint2
NCTI standard/CRM with Yealink
For security reasons the usage of the NCTI standard / CRM needs to be confirmed on the telephone initially
Use your computer as remote control for your system phone with CTI (computer telephony integration) for Mitel, Panasonic (KX-UT series), snom and Yealink phones. Find more details here. Additionally it is possible to integrate CRM and ERP systems. A plugin for Microsoft Skype for Business is included by default.
With the NCTI standard / CRM client it is possible to integrate several Customer Relationship Management tools (CRM) into our system. The resulting shortened work processes and the simplified call management increase productivity and efficiency at work places.
The NCTI standard / CRM client is terminal-server compatible (except TAPI).
NCTI standard/CRM with Yealink
For security reasons the usage of the NCTI standard / CRM needs to be confirmed on the telephone initially
Compatibility
Use your NCTI standard / CRM client for following operating systems (32 bit as well as 64 bit):
 Windows 7Windows 8Windows 10Windows 11
The client is compatible with the following certified device manufacturer:
Panasonic (except DECT phones)
snom*
Mitel (before AASTRA)
Yealink
*snom D862 and D865 are excluded.
Find a detailed overview of the compatibility here.
Version
Please find the latest client version by activating the administration user interface.
The 32- and 64-bit compatibility is regarding your Microsoft Office application only.
NCTI standard / CRM 32bit: Typically your client is compatible with a 32-bit Office package and a 32-bit operating system. To install your client at a 64-bit operating system and a 32-bit Office package, you need a 32-bit installer.
NCTI standard / CRM 64bit: Typically your client is compatible with a 64-bit Office package and a 64-bit operating system. Your client is not compatible with a 32-bit operating system and 64-bit Office Package. The 64-bit installer does not work for a 32-bit operating system.
No content available.
No content available.
Please consider the following requirements to ensure an optimal use of the NCTI standard/CRM client:
- a PC with operating System Windows Server 2012, Windows Server 2016, Windows Server 2019, Windows 8, Windows 10 or Windows 11. Processor: x68 as advised by Microsoft for Windows Operating Systems. No support for ARM processors.
- an IP system phone by the following device manufacturer: Mitel (formerly AASTRA), Panasonic (except DECT phones), snom or Yealink
- IP address of your system phone, extension number and VoiceMail PIN
It is possible to install the NCTI standard / CRM in a terminal server environment. The TAPI interface is not terminal server compatible.
To find the IP address of the respective system phone, please have a look at the instructions by the device manufacturer. Click here to find an overview of all desktop phones manuals.
For installations greater than 400 user please check the system requierements here.
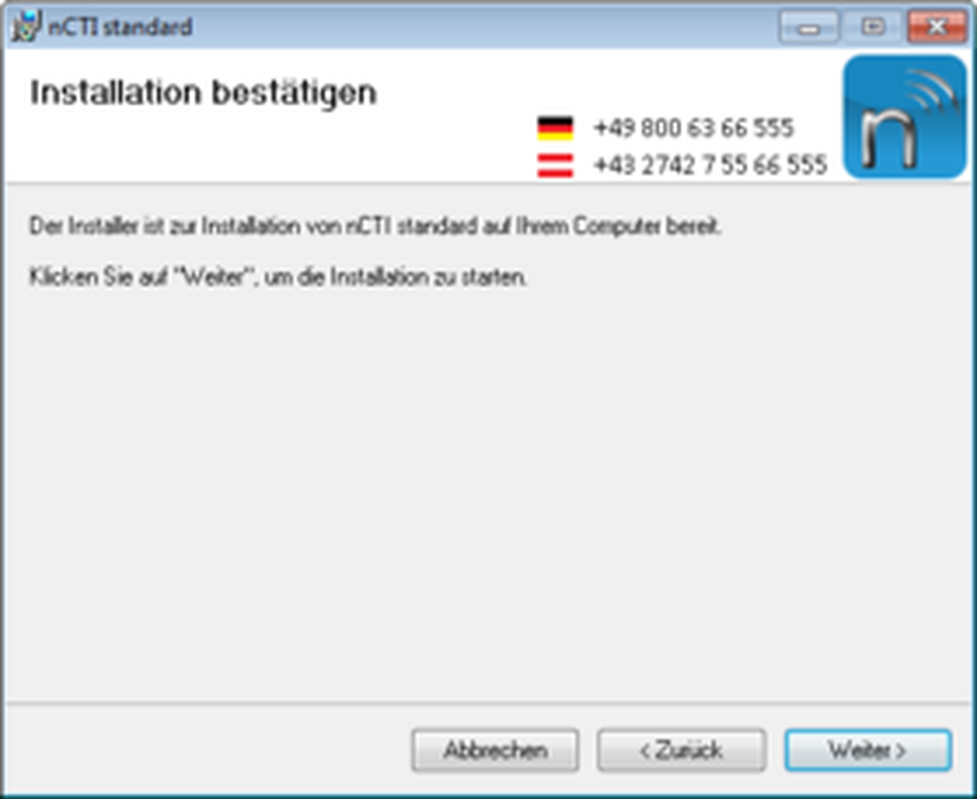
The NCTI standard client is available in two versions. The basic version is not covered with CRM integration. Dependent on which version you use, you're able to download the respective setup for the NCTI standard or NCTI standard CRM at the downloads page. Please start the setup and follow the instructions by the installation wizard.
Please find an example installation procedure of the NCTI standard / CRM at the following.

Please note the following information when choosing a 32bit or a 64bit compatible client.
The 32 and 64bit compatibility is regarding your Microsoft Office application only as exemplary described in the following:
NCTI standard / CRM 32bit: Typically your client is compatible with a 32bit Office package and a 32bit operating system. To install your client on a 64bit operating system and a 32bit Office package, you need a 32bit installer.
NCTI standard / CRM 64bit: Typically your client is compatible with a 64bit Office package and a 64bit operating system. Your client is not compatible with a 32bit operating system and 64bit Office Package. The 64bit installer does not work for a 32bit operating system.
Please start the setup and follow the instructions.
Please find an illustration of the installation below.
- Click Next.
-Click Next.
The installation procedure can take some minutes.

- Click Close.
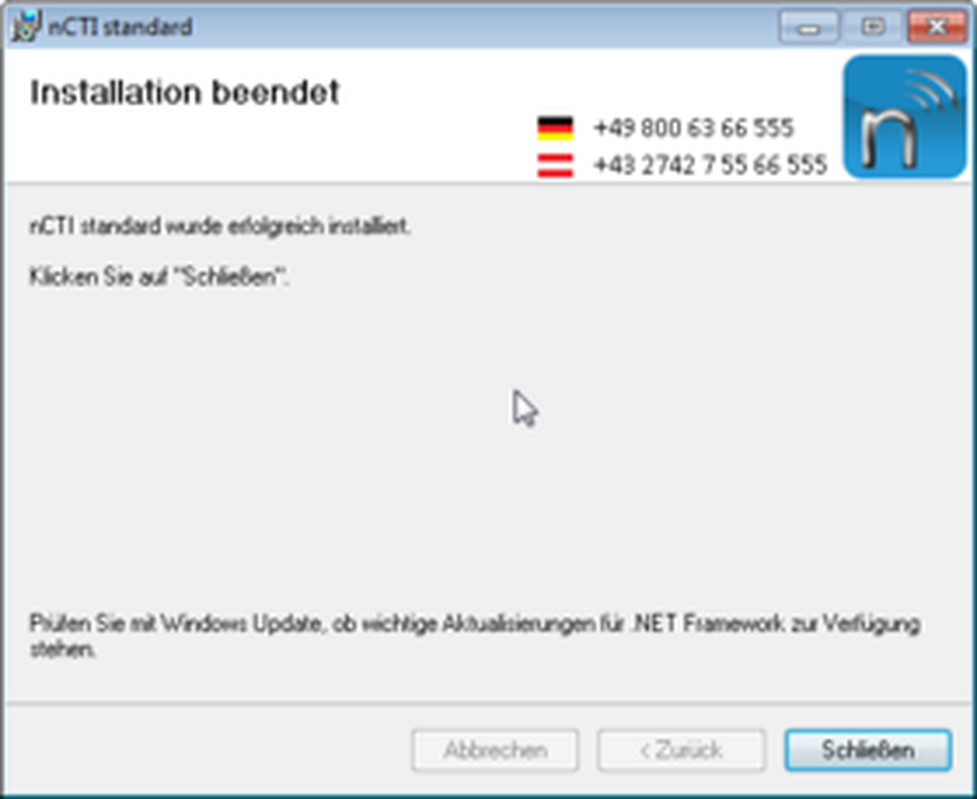
As soon as the installation is successfully completed you'll find the NCTI standard symbol in the tray.
Until now, client is not linked to your desktop phone.
Visit C.3. Device configuration to receive further information how to integrate client with your desktop phone.
NCTI standard / CRM is in auto start mode. This means that the application starts running as soon as you start your PC. At successful start and connection to your device, the client in the tray  changes from grey to blue.
⇒ The installation procedure is with that successfully completed!
No content available.
Integrate system phones at the NCTI standard / CRM client by following device manufacturer: Mitel (formerly AASTRA), Panasonic (except DECT phones), snom or Yealink.
Find an overview of all certified devices by the above mentioned device manfucturer.
To connect your client with your device, enter the system phones's IP address, your extension number and voicemail PIN.
As soon as you correctly entered all relevant information, your device automatically connects to the client and you can start right away.
Here you will find the configuration for your extension.
Define a valid license
A valid license for the client has to be defined in the administration portal. Follow these steps:
Visit Administration/Profile and change the CTI mode within Options to "On ". Contact your system administrator for further instructions and steps.
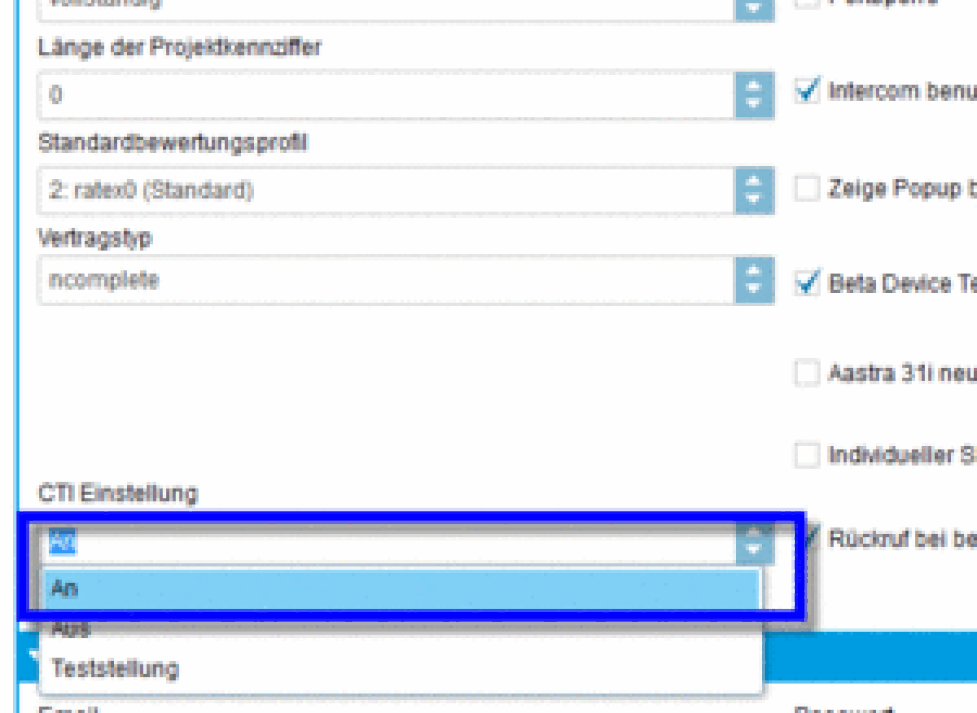
-Log into the administration portal with K-number and nvoice password (e. g. K1234 and test123) as soon as the CTI mode has been activated.
-Visit TARGETS and enter your extension number into the search box. Open the administration settings by double-clicking on the according entry. Check your CTI settings within "Configuration". If there's none or a incorrect CTI client defined, choose your client with or without CRM plugin.
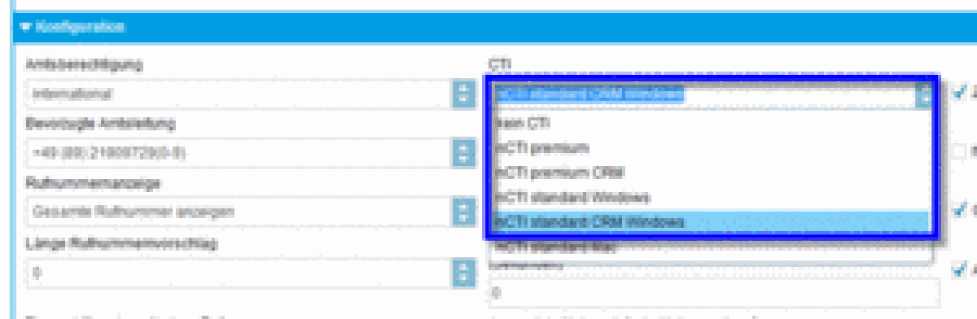
-Save your settings by clicking Save.
⇒Your settings will be applied and you are ready to use the NCTI standard / CRM client.
Configuration of the # trunk length
The length of the the # trunk can be defined in the administration portal under administration / trunks. If the trunk number is a single digit, calls will be displayed as #10123456789 instead of 00123456789.
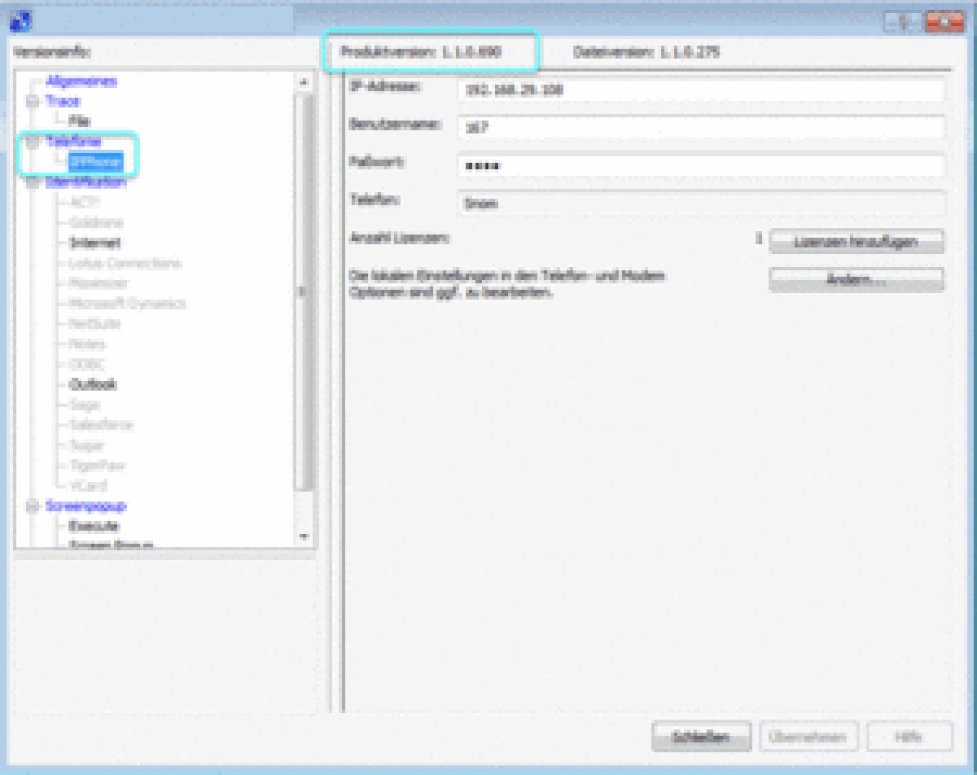
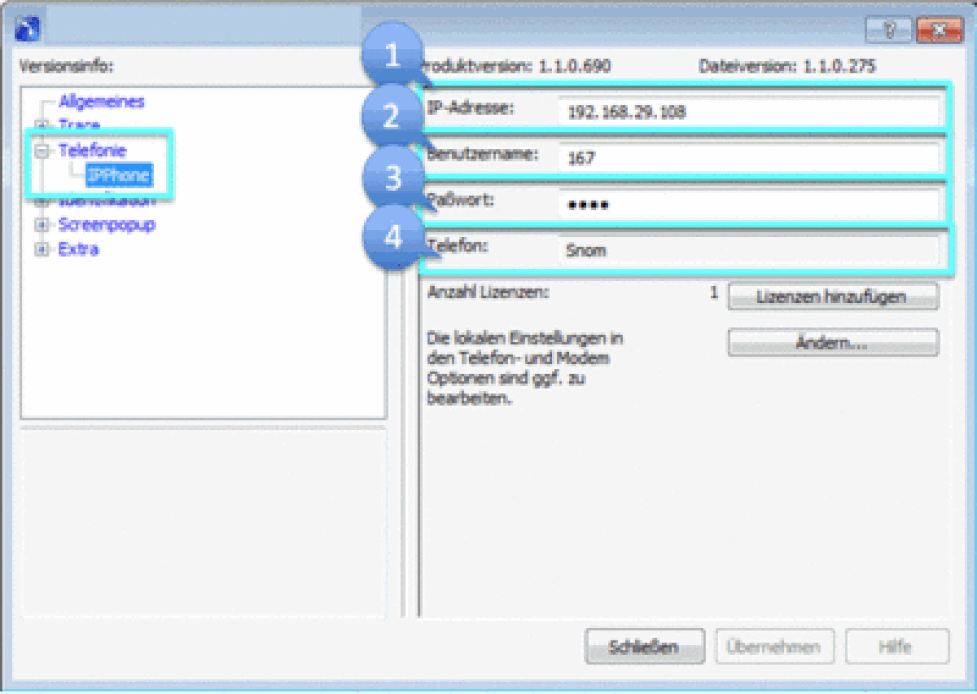
Client configuration with connection to your device
Open the administration panel by double-clicking the symbol in the menu bar .
-Click on Telephony in the adminstration panel.
-Click on "IPPhone" in the opening window.

- Enter your device IP address. To find the IP address of the respective system phone, please have a look at the instructions by the device manufacturer.
- Enter your extension number.
- Enter your voicemail PIN out of the administration portal as password.
- Device and client connect to each other now.
-As soon as you correctly entered all relevant information, please click Save.
⇒The Client is now ready for usage.
-Click Close to close the administration panel.
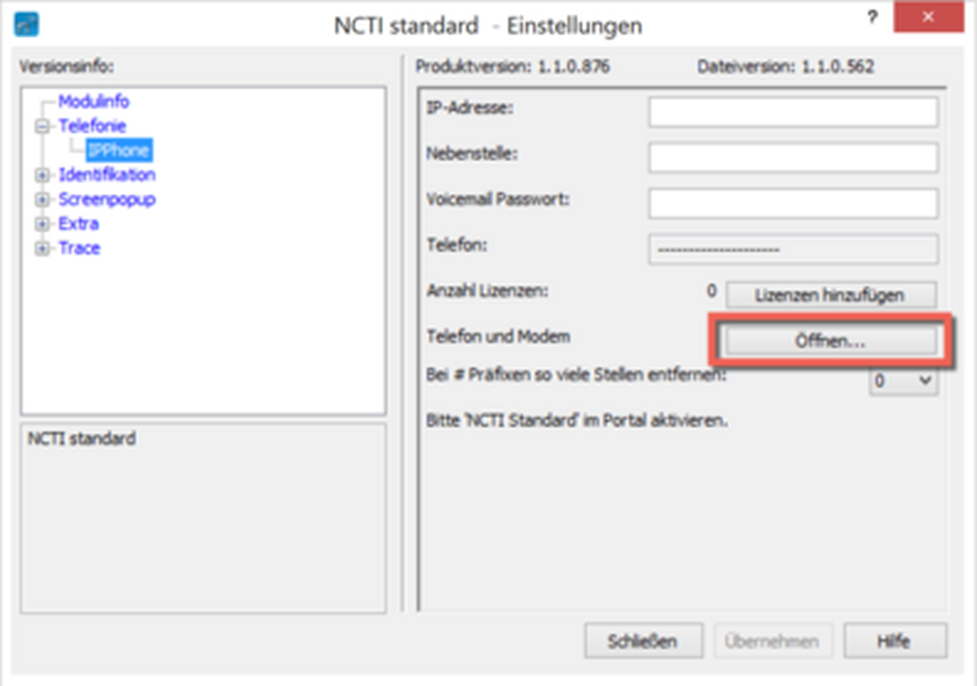
Configuration of Phone and Modem settings
For configuring the Phone and Modem settings and the related prefix for external calls, please find the steps below:
-Open the administration panel by double-clicking the symbol in the menu bar .
-Click on Telephony in the adminstration panel.
-Click on "IPPhone" in the opening window.
-Please click Open for configuring the Phone and Modem settings.
-Please choose your location (e. g. My Location) within the Phone and Modem configurations panel and click Edit
-To close the client, right click on the NCTI standard symbol in the menu bar and choose Cancel.
After successfully closing the client, the NCTI standard symbol disappears out of the tray. If the symbol still appears in the tray, the client runs in background mode.
No content available.
No content available.
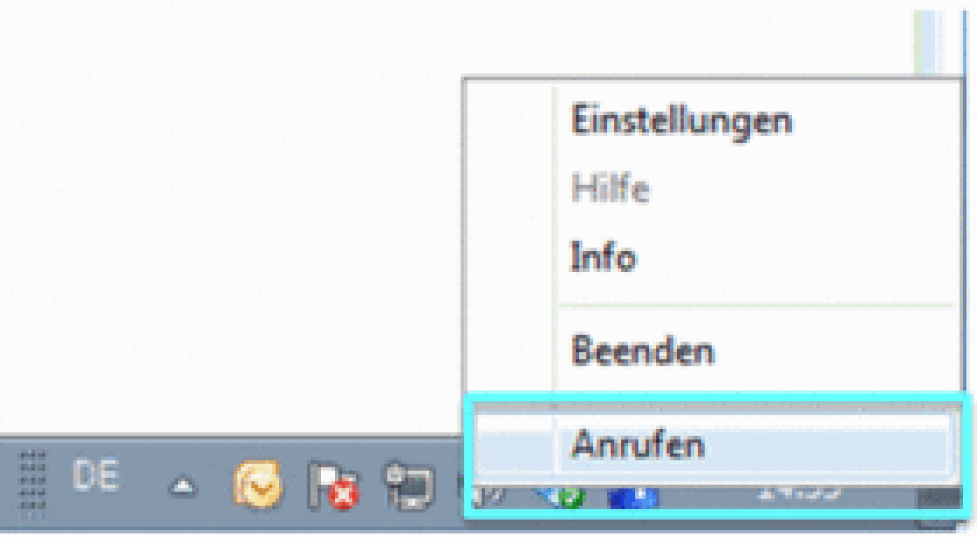
One option to dial a telephone number via NCTI standard / CRM is using the Clipboard Dial function. With this function you can call someone by marking a telephone number with your mouse from the Internet browser.
-After marking the telephone number, click on Copy using a right click.
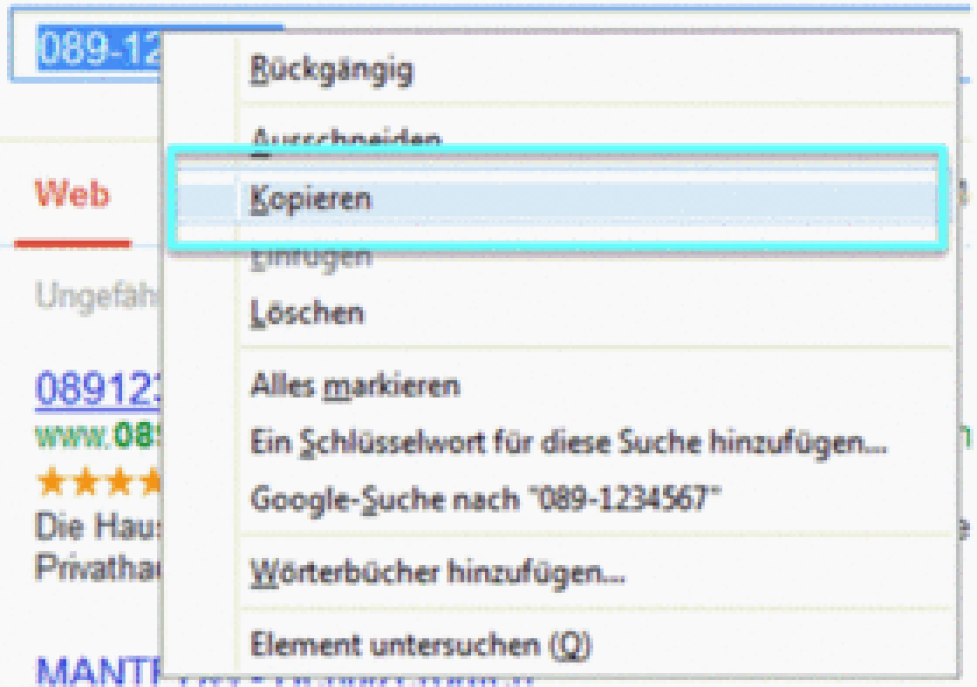
-Click on the symbol with a right click and select Call.
⇒The telephone now builds up a connection to the telephone number.
The Hotkey Dial function enables you to dial numbers marked on your computer or end a conversation via a hotkey.
-Click on the symbol in order to access the client's administration surface. The symbol is located in the menu bar on your computer.
-When in the menu, click Extra and choose Hotkey Dial.
Dial
On default dialing a number uses the hotkey CTRL + F10.
-You can choose between the keys F1 and F12 using the dropdown menu. Further it is possible to select either the shift key, CTRL or ALT key as second hotkey.
Example:
Select the telephone number e.g. in your browser. By pressing the hotkey which has been configured in advance, your telephone dials the selected phone number.
-In order to save the settings, click on save.
Hang Up
On default hanging up uses the hotkey combination CTRL + F9.
-Click on the dropdown menu. You can choose between the keys F1 and F12 using the dropdown menu. Further it is possible to select either the shift key, CTRL or ALT key as second hotkey.
Example:
If you are in an active conversation and want to terminate the conversation using a hotkey, press the preconfigured hotkey combination. Your system telephone will now terminate the active call.
- Save your settings by clicking on Save.
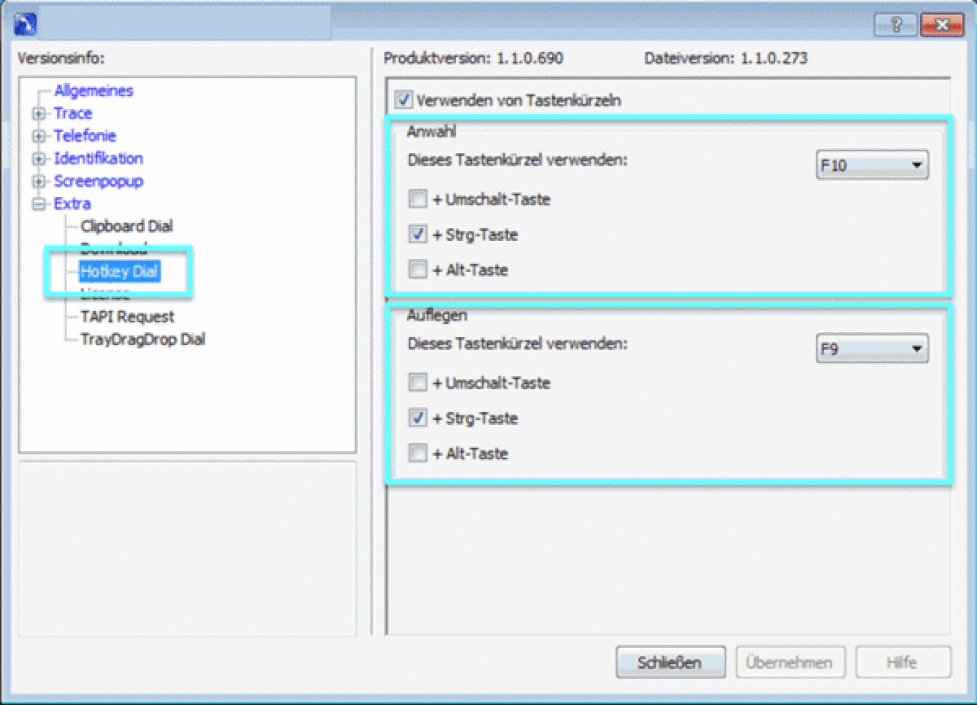
Hanging up via hotkeys is not yet possible for Mitel (formerly AASTRA) system telephones.
To perform a call using Drag & Drop, take the following steps:
-Mark the desired telephone number with your mouse cursor .
-Click onto the telephone number and hold.
-Drag the number with the mouse onto the NCTI symbol in the menu bar.
⇒Your telephone now starts dialing the selected telephone number.
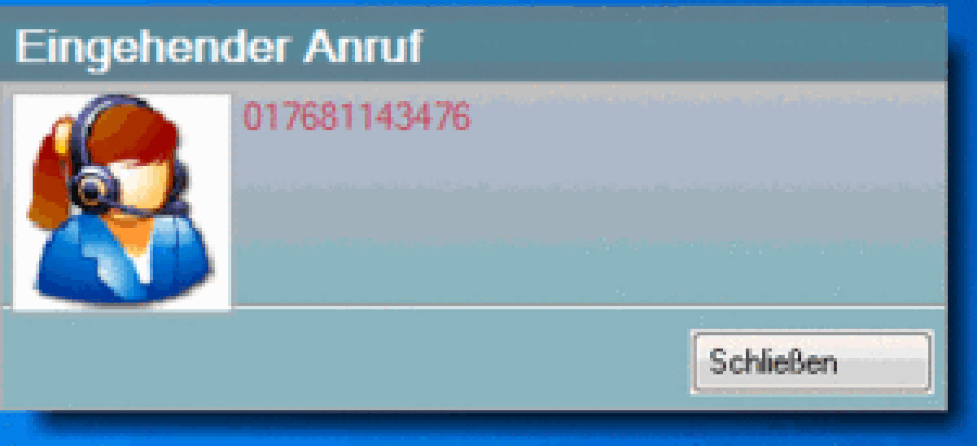
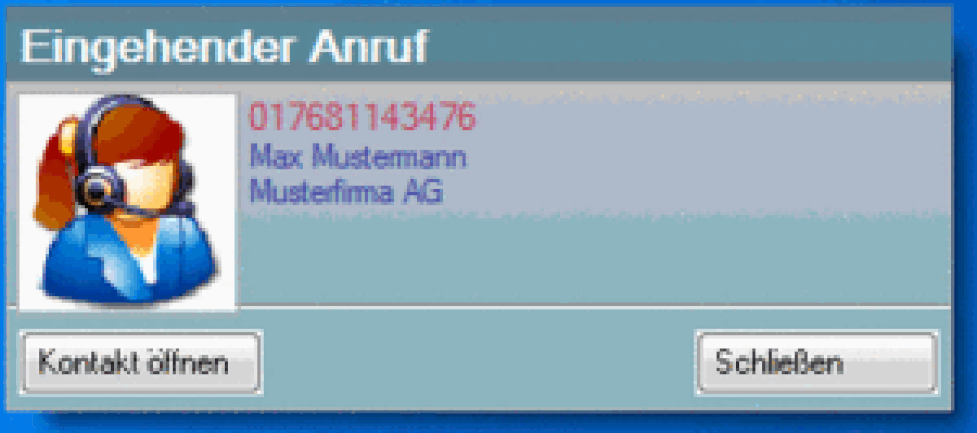
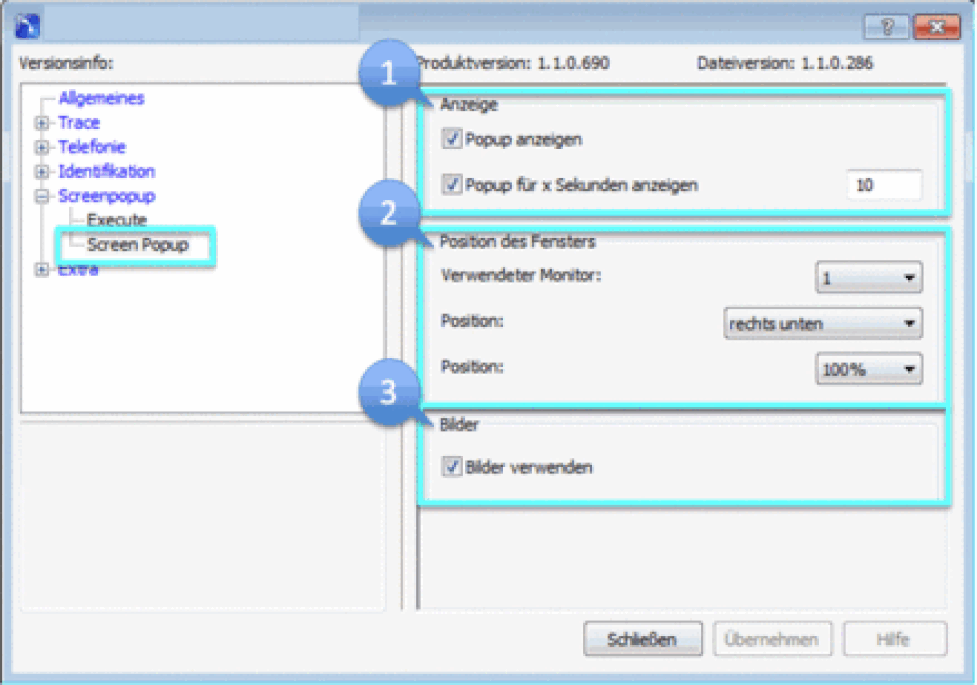
Incoming calls are signalized by a pop-up window. The pop-up window makes it possible to quickly identify the caller.
Since the client refers to CRM tools like MS Outlook, callers can be shown with all known information filed in the tool. By clicking on the field Open Contact, the contact information from Outlook (or any other CRM tool refered to) is immediately shown.
Depending on which CRM application you integrate, you have the opportunity to get further information from the application about the caller, if the caller is filed within the CRM data base.
The visual display of the window can be customized.
- Click onto the client symbol in your menu bar.
- Choose Screen pop-up and again Screen pop-up to get to the adminstration window.
- Mark whether you would like the pop-up to be shown and how many seconds it should appear. Enter the number of seconds the pop-up should appear.
- Determine position and size of the pop-up on your screen.
- Checking Use pictures, enables pictures assigned to the caller to be shown in the pop-up.
On default, the NCTI standard client is provided with a Skype for Business plugin enabeling synchronising the functionality of the client with Skype for Business.
The plugin connects automatically the client with Skype for Business after successful installation. Functions like instant messaging and presence managmeent can thus be combined with your telephone system.
Supported versions are
- Lync 2010
- Lync 2013
- Skype for Business (Office 2016)
The Basic version of Lync (Lync Basic 2010 and Lync Basic 2013) are not fully supported. E.g. the function "NFON Call" is not available for Lync basic versions.
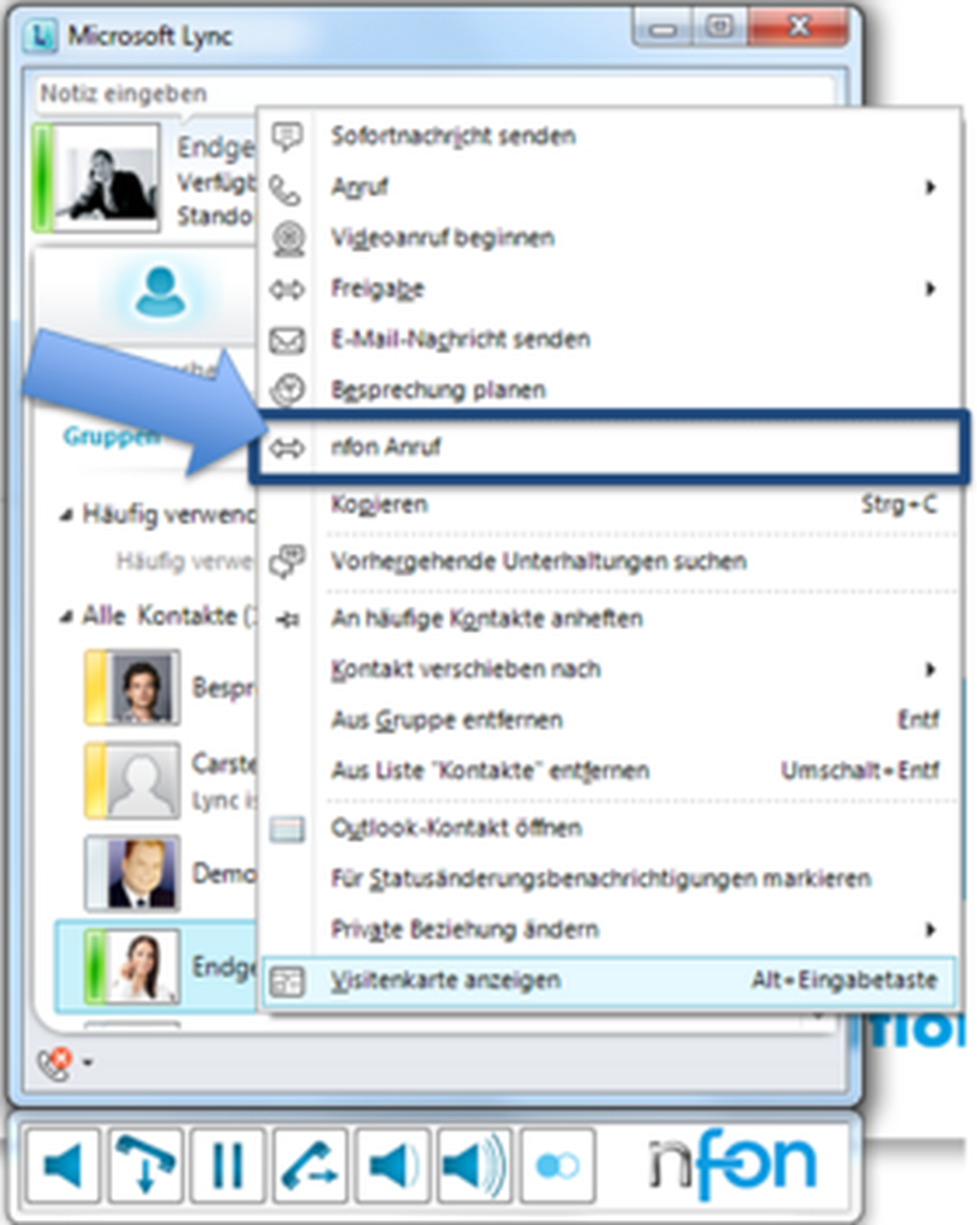
Calling with Skype for Business
- To perform a call via Skype for Business, click with a right-click on the contact and choose NFON call.
⇒ Your telephone starts a connection with the contact.
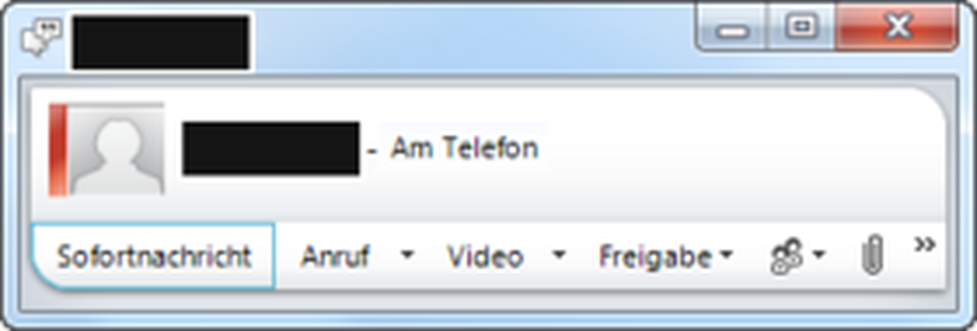
Your presence state adapts automatically while you make a call. The state is displayed next to the profile picture with a red bar. A green bar means the line is unoccupied.
During a conversation calls can be managed via the computer using the NFON menu bar. The menu bar is located at the bottom of the Skype for Business Window.

Overview
| Symbol | Description |
| | Line Key A new line will be opened using the line key. |
| | End key End the current conversation using the end key. |
| | Hold key Set the current conversation on hold using the hold key. |
| | Transfer key Transfer conversations to another party. |
|
| Volume key During a conversation you can highten or lower the volume of the call. |
The client does not support Mitel (formerly Aastra) and Panasonic system telephones with all functionalities. The menu bar shows only those functions that can actually be used.
Actions can be filed under the Events tab making your call management more efficient and organized.
Individual Events
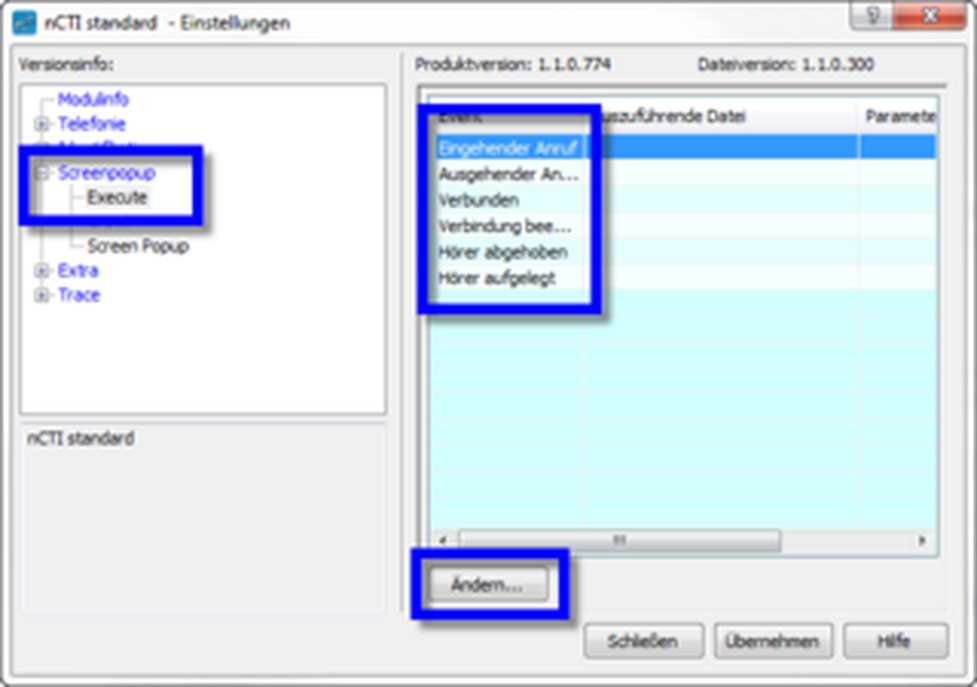
If individual actions are supposed to be connected to various scenarios, click on the blue NCTI icon in the menu bar with a right click and choose Actions.
-Choose the Screen pop-up item in the settings menu. Go on Execute by clicking on the + symbol.
-Thereafter choose the respective event and click on Change.
A window "Programs and Parameters" pops up.
- Enter your program path and name of the application that is supposed to be called during your chosen event (e.g. incoming call).
- Enter the URL of the website (incl. HTTP://) under Parameter. Alternatively enter the parameter that will be handed over to the executive file e.g. {NUMBER}
- Confirm your entries with OK.
Example: You are using Google as CRM tool.
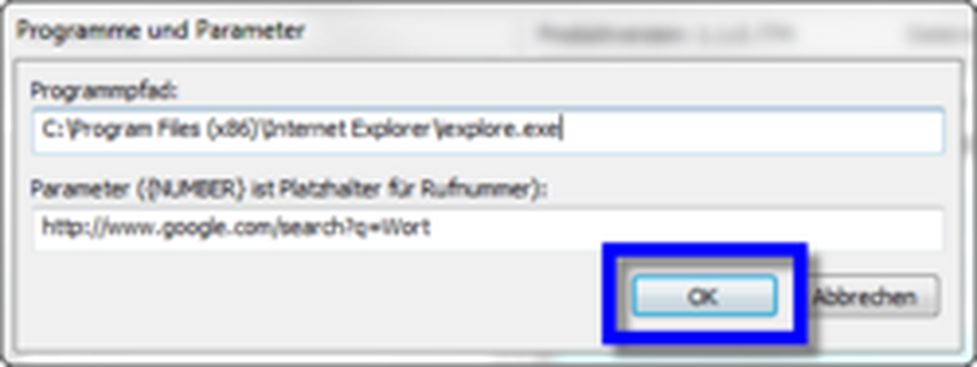
Program
- Choose a browser from your program list. In this example this is the Internet Explorer.
Parameter
- To have "Number" searched by google, the URL is:
http://www.google.com/search?q={Number}
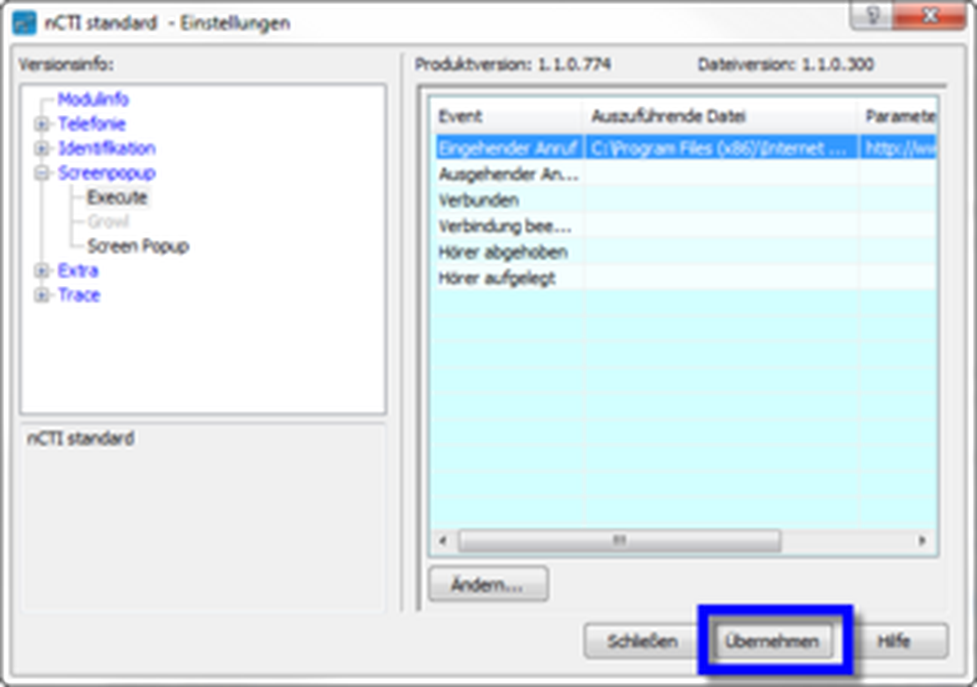
- After successfully entering the executive file and the parameter, click on Save.
⇒You are now using Google as a kind of CRM tool.
No content available.
The NCTI standard / CRM client allows integration of various CRM tools.
Those are:
- Act!
- DATEV
- Freshworks Sales CRM
- Goldmine Premium Edition
- HubSpot
- InteractIO
- Lotus Connections
- Maximizer CRM
- Microsoft Dynamics CRM
- Microsoft Outlook + Exchange Public Folder
- Netsuite
- Notes
- ODBC-Databases (Adjustment via SQL-Commands)
- Odoo CRM
- Pipedrive CRM
- Sage CRM
- Salesforce CRM
- Sugar CRM
- Tigerpaw CRM
- vCard / LDAP
- Zoho CRM
This allows for integration of all your contacts in the company database into the PBX. The following pages show how CRM integration is done with Outlook and Internet.
With the NCTI standard CRM client you can integrate your Outlook contacts into your PBX. Hence, you know who is calling and are prepared for your conversation optimizing working processes and productivity.
Integration of Outlook
- Double click on the NCTI symbol in your menu bar to access the administration surface of the client.
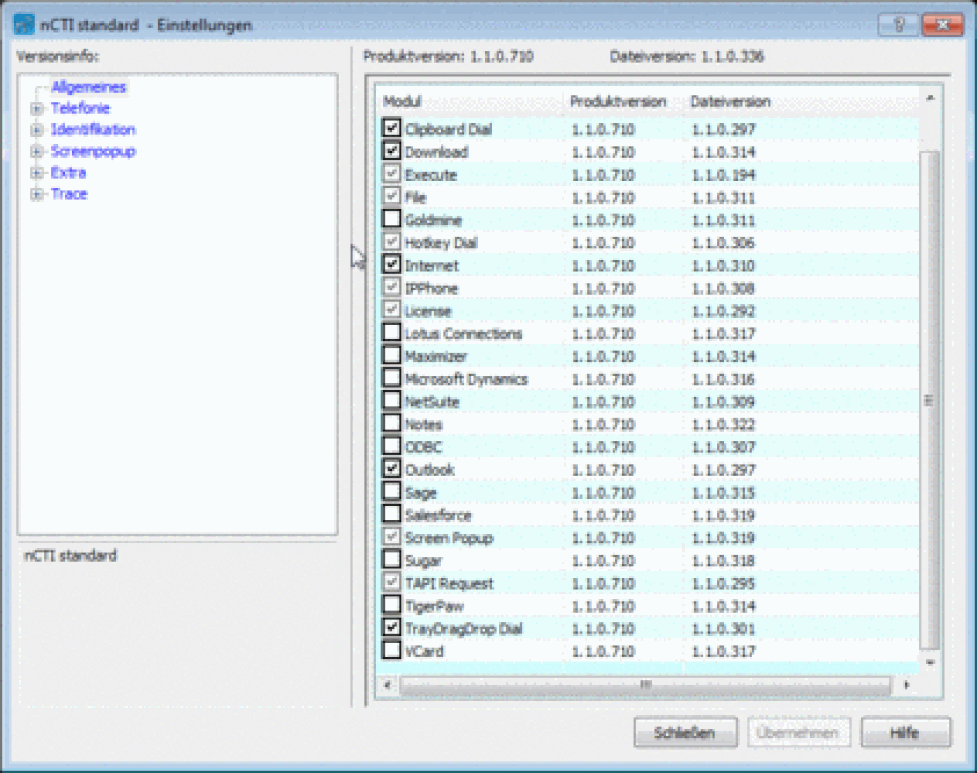
-To activate Outlook choose "Outlook" in the list and check the respective box.
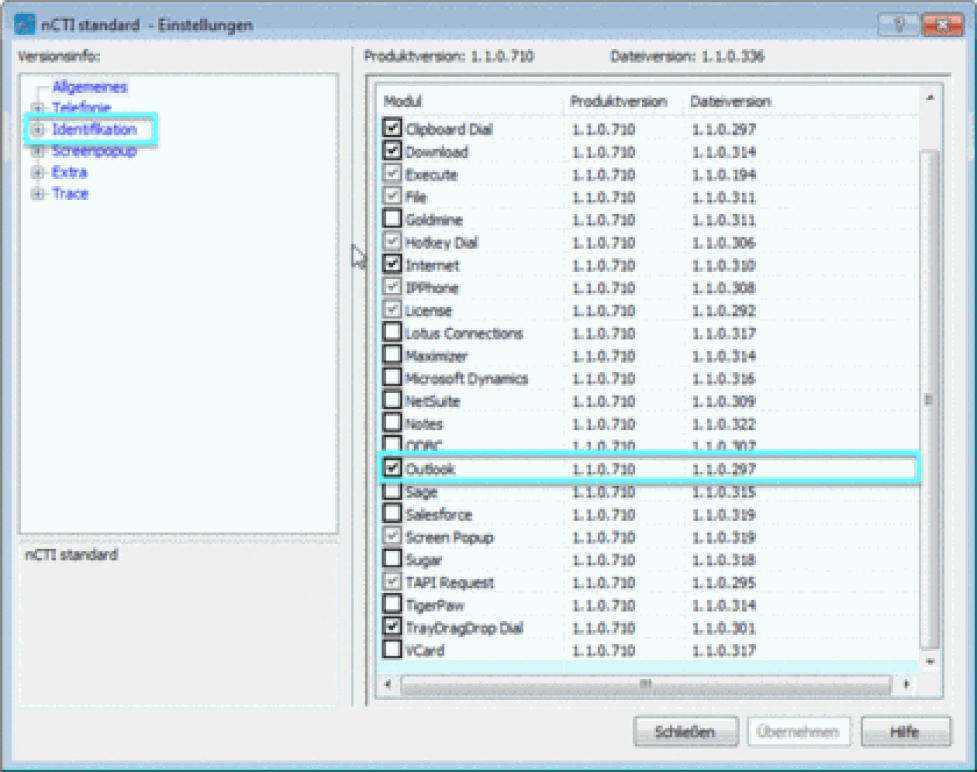
To ensure synchronising of the client and Outlook, the client has to be restarted once.
Incoming Call
If you have already filed a contact in Outlook, the contact will be shown as a pop-up with all known details.
The contact can be opened by clicking on Open contact. All details from Outlook will be shown and can be read before taking the call.
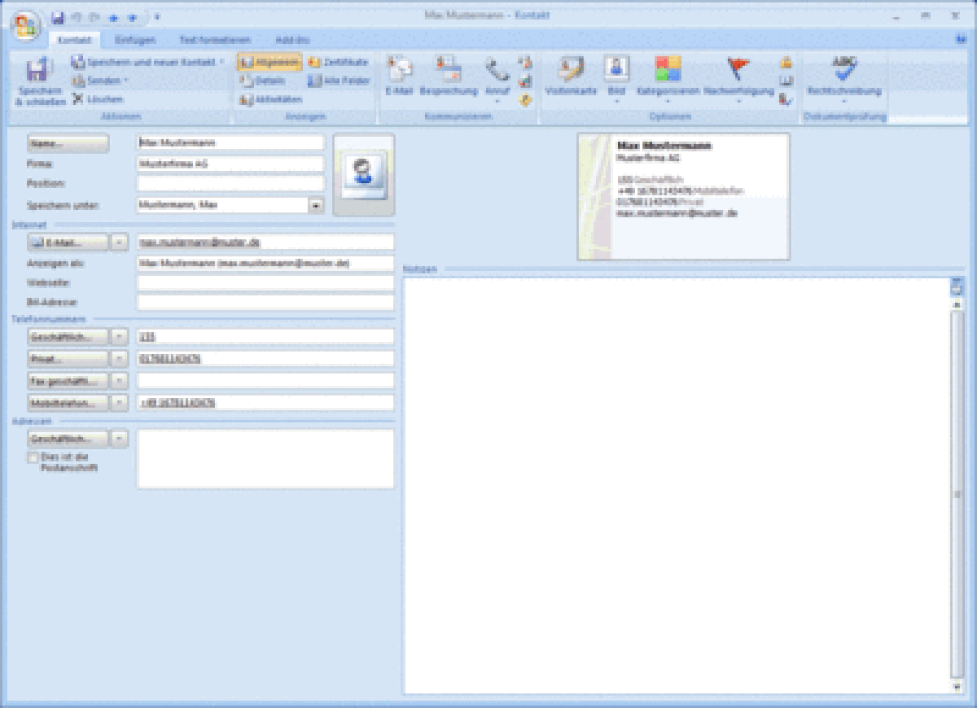
Please note that calls from the person view are not possible.
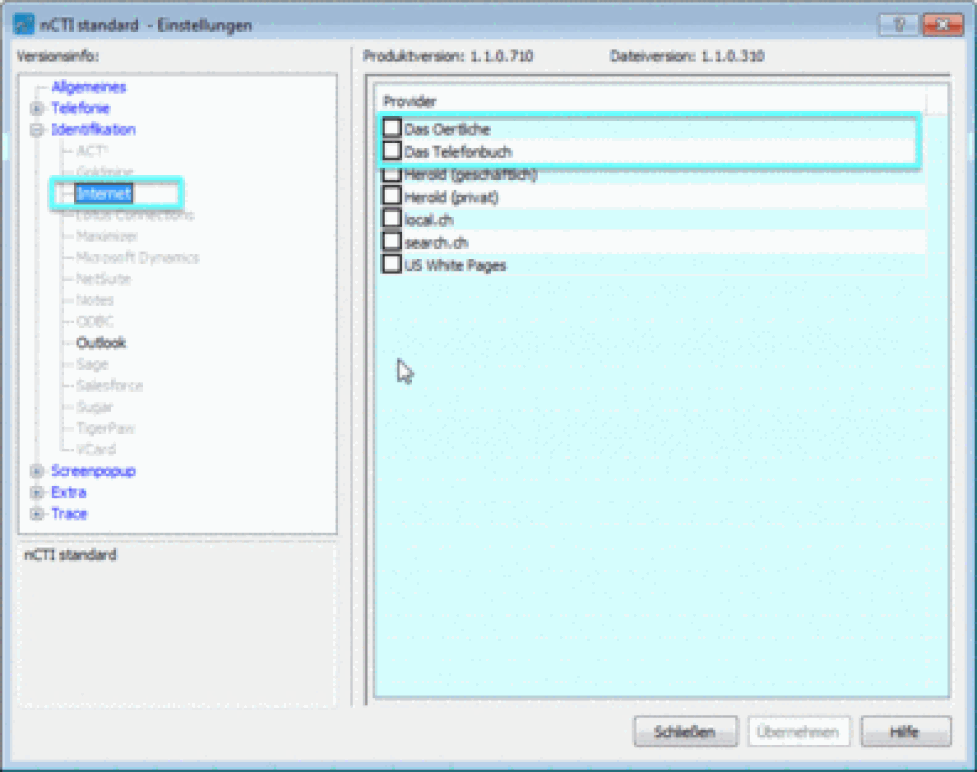
Using the tool "Internet" contacts of online directories are available to the client.
- Double-click on the client symbol in the menu bar to access the administration surface.

- Click on Identification. Choose Internet. You can now check online directories available.
⇒ All contact details available in this directory will be displayed at incoming calls.
The client will synchronize with Outlook as soon as it is restarted
Salesforce is compatible with the client. All contacts managed in Salesforce can be displayed at incoming calls.
Salesforce Plugin of NCTI standard works with the following Salesforce editions only:
- Enterprise
- Unlimited
- Developer
- Double-click on the NCTI symbol on the menu bar to access the administration surface of the NCTI standard CRM client.
The following instruction explains the integration of Salesforce into the NCTI standard CRM client.
-Click on Identification.
-Choose Salesforce.
-Enter your Salesforce login.
-Enter your Salesforce password and security token without spaces.
-Choose whether the telephone numbers from Salesforce should be displayed unformatted, in canonic format or without prefixes.
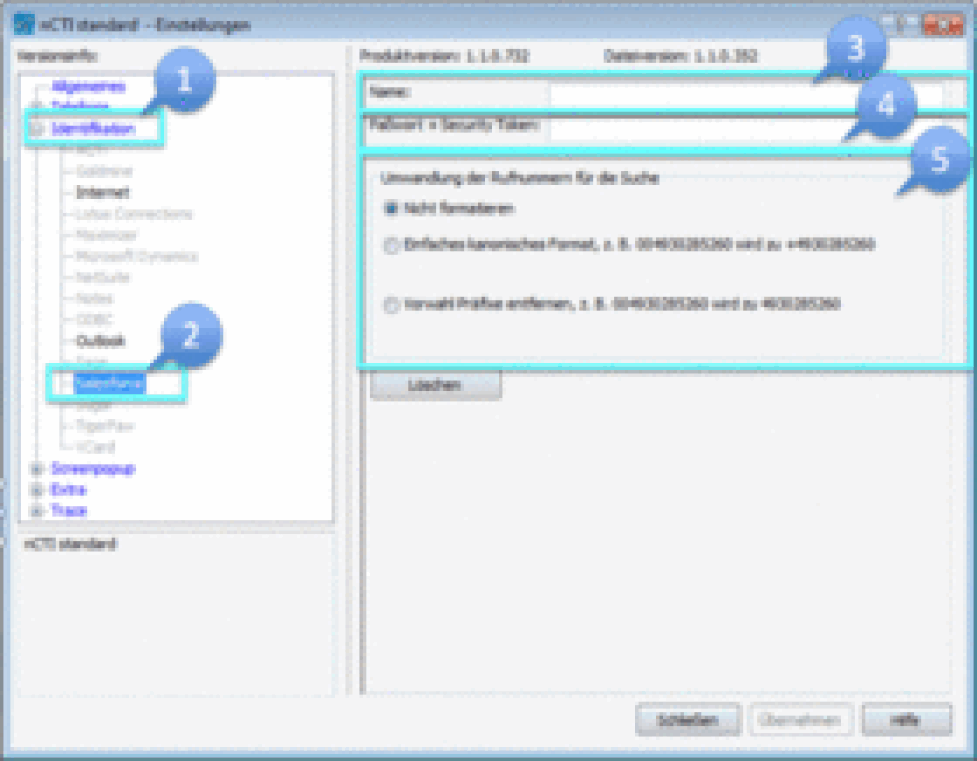
In order to receive a security token, contact your system administrator. Incorrect use or reset of the security token can disable all external program interfaces.
Restart the client to synchronise the client with Salesforce.
What is TAPI?
The Telephony Application Programming Interface (TAPI) is a Microsoft Windows API, which provides computer telephony integration and enables PC's running Microsoft Windows to use telephone services. This Interface was developed by Microsoft and Intel in 1993. With Microsoft Windows 95, TAPI was integrated into the operating system. Applications like ISDN (well known in Europe) are using TAPI.
How to install TAPI ?
The TSP driver (TSP = TAPI Service Provider) is co-installed on your system during the installation of the client. Subsequently can TAPI compliant software (e.g. Microsoft Outlook) configure and use the TSP driver as telephone line. The actual configuration process differs between manufacturers. Please refer to the manual of your software (e.g. a Customer Relationship Management software) for details about TAPI configuration.
Current TAPI version: TAPI 2.2
The name of our TAPI telephon line is: NCTI standard
Calls that are routed through the client are signalled by our TSP (Telephony Service Provider) automatically to all other TAPI compliant applications (other third party CRM software). Third party applications can use information that is offered by the phone to open contact windows or notice forms.
TAPI is available for the NCTI standard client with CRM integration only.
Please note that the TAPI NCTI standard driver is not terminal server enabled, whereas the NCTI standard client itself is.
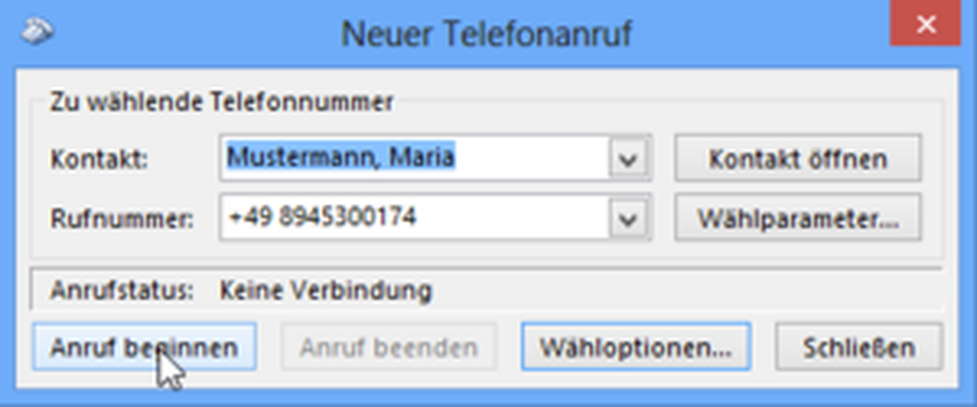
Dial from Outlook
-Ensure that the NCTI standard CRM client is active and start Outlook as usual.
-Open the address book with a right-klick on the contacts symbol.
-Right-click on the name, e.g. Jane Doe, and click on "Call".
-Click on the number assigned to the contact.
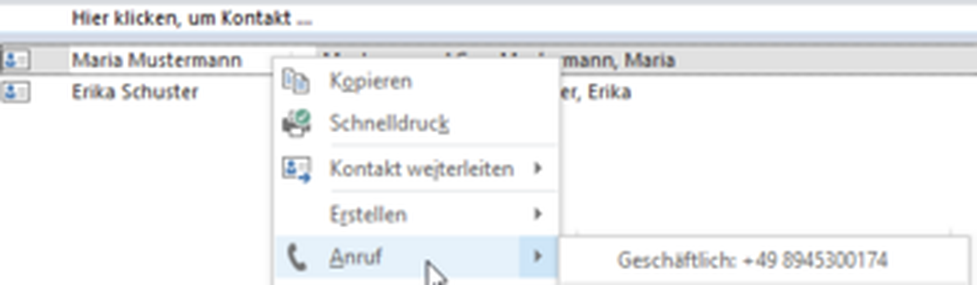
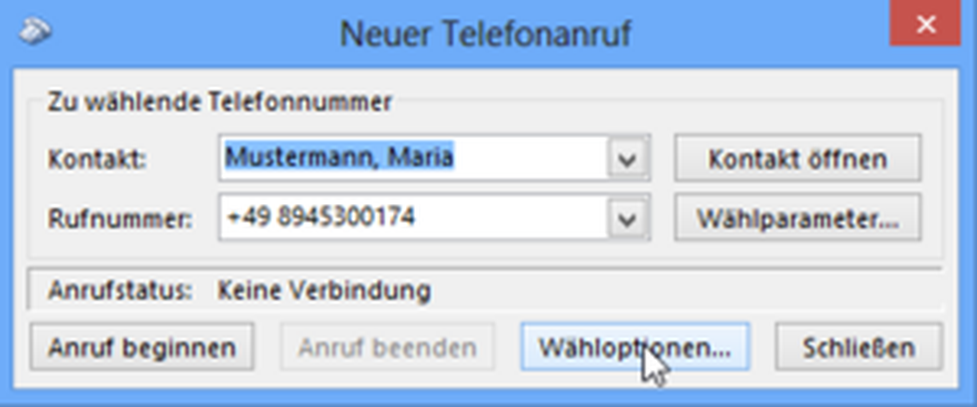
⇒A new window pops-up with a name and telephone number.
At first use, you have to enable calls via NCTI standard CRM client.
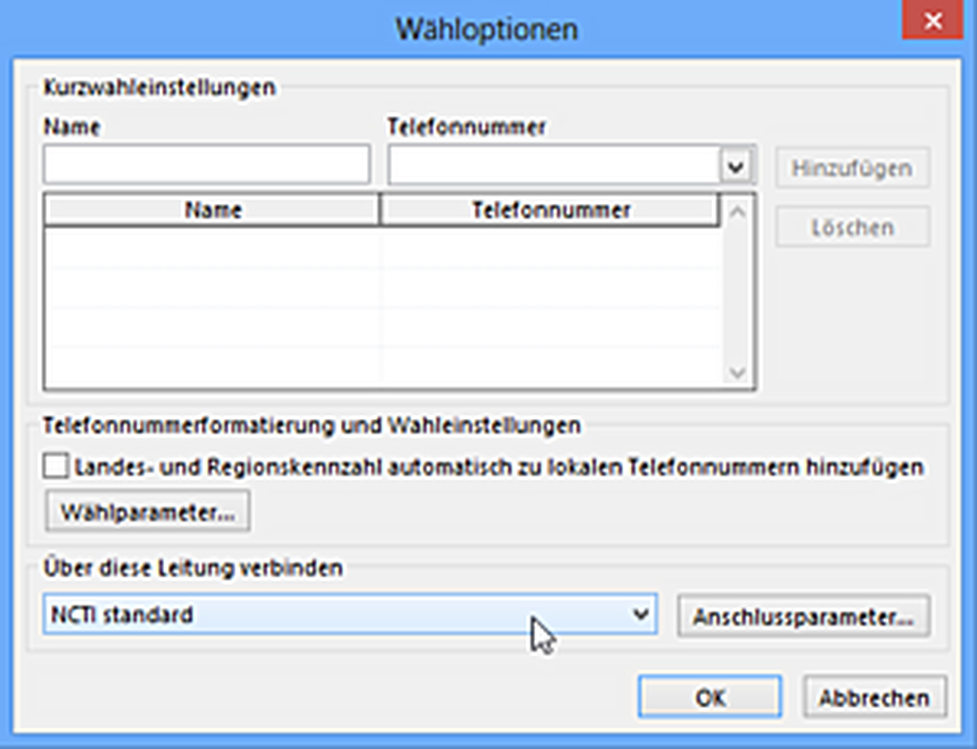
- Click on Dial options.
-A click on the arrow shows a list with all available TAPI lines.
-Click on the arrow down button until NCTI standard is available.
-Click on OK to validate and save your choice.
-Click on the arrow and on the contact's number.
-Click on Start Call and lift the handset.
⇒After a moment the contact's phone rings.
- After finishing the conversation, hang up or press the X-key on your telephone.
Number resolution for incoming calls is available via the NCTI standard CRM Outlook plugin. There is no need to add a TAPI line.