1. Requirements
Jump to:
No content available.
In order to use this IP telephone with your telephone system you will need a sound broadband connection.
If you only have a single circuit plug available (e. g. in home offices) but would like to access the Internet with your laptop while making calls with the telephone, you can connect the network cable (R145) to your telephone and thanks to the switch integrated in the telephone, simultaneously connect your laptop directly to the telephone (except Mitel (Aastra) 6730i).

Since October 1st, 2014 Aastra is renamed Mitel. All Aastra IP telephones were renamed to Mitel.
The Mitel 6753i is End of Life since July 1st 2015.
All telephones you receive are preconfigured and connected to the telephone system.
No content available.
You have the option of voice encrypting (SRTP) your telephone calls. You can activate this function for your customer account via the administration portal at any time.
- Activate the function on the administration portal.
- Restart all telephones. Restarting may take a few minutes. During a conversation a lock icon on the telephone display indicates encryption is activated.
⇒ The active call is now encrypted.
Call forwarding
You can configure various call forwarding scenarios. For this purpose you can use the call forwarding profiles.
Under the telephone menu you can only edit the default profle (catch all / always) to be found under the call forwarding profiles. You can edit the remaining call forwarding profiles via Ncontrol or via the administration portal. For more information, refer to the administration portal manual and the Ncontrol manual.
The following call forwarding options are available. You can activate or deactivate call forwardings via the telephone menu's call settings.
Permanent call forwarding (always)
All incoming calls will be forwarded directly to the predefined telephone number.
Forward if busy (busy)
New calls will be forwarded immediately, when coming in during an active call. This call forwarding option functions only, if the Call Waiting function is deactivated.
Delayed call forwarding (no answer)
Call forwarding condition: You do not answer the incoming call within a defined time period (timeout). The timeout can be set to 5, 10, 15 or 20 seconds. Where should the incoming call be forwarded after the specified time has elapsed? The caller receives a call waiting signal and is then forwarded to the defined destination.
If unavailable (not registered)
The option functions only if the end device is not registered to the telephone system:
- When the Internet connection fails or there is no LAN connection.
and
- If “call forwarding …if unavailable” is programmed for a direct extension (e.g. extension 123 - John Doe) and a caller calls the direct dial number for the extension directly, call forwarding applies. If the extension is a member of a queue or a group and the queue or group receives a call, call forwarding for the individual extension no longer applies! In general, the destination should always be an available destination number. I.e., make sure that no voicemail or announcement comes on.
Active call forwarding will be shown on your telephone display.
Active call forwarding will be shown on your telephone display.
Call forwarding codes
Call forwardings can alternatively be activated through * codes:
| *10 | Activation of the call forwarding profile |
| *11 + destination | Permanent call forwarding to telephone number |
| **11 | Cancel permanent call forwarding |
| *12 + destination | If no answer after a specific time, delayed call forward to telephone number |
| **12 | Cancel delayed call forwarding |
| *13 + destination | If busy, forward to telephone number |
| **13 | Cancel call forwarding if busy |
| *14 + destination | Call forwarding if unavailable |
| **14 | Cancel call forwarding if unavailable |
When disconnecting
When disconnecting the connection between the end device and the telephone system, it can take up to 60 seconds for the call forwarding to work. Once the end device is reconnected to the telephone system, it can take up to 60 seconds for it to register.
The basic function of “Hot desking” allows cancelling the registration of existing users and registering new users to your end device. This function is useful when employees frequently change their work station but don’t take along their end devices. After completing registration, your configuration is automatically copied to the new telephone.
Step 1: Cancelling the registration of the current extension
Menu key  Telephone settings Cancel registration of the extension Confirm
the registration of this extension is now cancelled. This may take some time.
Step 2: Registering the new extension
Menu key Enter the extension number Confirm Enter VoiceMail PIN
Confirm
The new extension is now registered. This may take some time.
No content available.
No content available.
No content available.
| Picture | Description |
| Ends an active call or cancels an action/entry. | |
| Options menu: The functions are visible but mostly not active – telephone system functions can only be accessed via the “Menu” key. | |
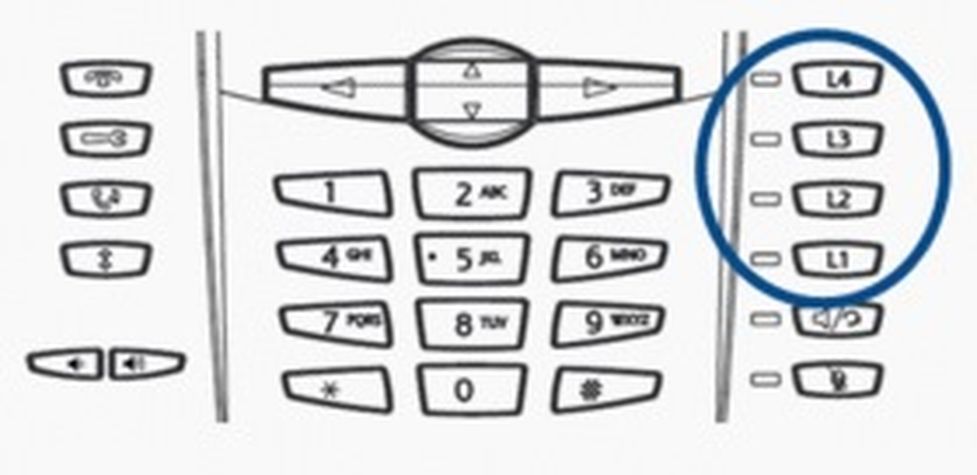
| Talk – to return to a call on hold, press the line key next to the flashing occupied/call light. | |
| Redialing – allows the last 100 numbers to be redialled. | |
| Adjusts the receiver volume or the ringer volume. | |
 | Line/call keys enable use of one of the open lines or to pick up a call. |
| Activates the hands-free function; when using the headset, it can be used to switch between the hands-free speaker and the headset. Models 6730i and 6731i do not feature a headset connection. Press the key to activate the hands-free function. | |
| Mutes the microphone during a call – the light flashes when muted. | |
 | Use the navigation keys to browse the display. |
1. For internal calls, only the extension needs to be entered.
2. When dialing external telephone numbers, you must first dial ‘0’, then enter the external number.
3. To complete dialling, in either case press the line/call key, pick up the receiver or select the programme key for ‘Dial’ in the display. If the receiver is not picked up, the call is placed in hands-free mode.
4. To end the call, return the receiver to the cradle (in hands-free mode simply press the cancel key  ).
).
Calling from the phone book (except Mitel (Aastra) 6753i)
1. Press the Access phone book key.
2. Enter the initial (or additional letter if necessary) of the name using the telephone keypad and confirm with the Continue softkey (on Mitel (Aastra) 673xi the down navigation key). You can also use the navigation keys to select or browse the entries.
3. Pick up the receiver to dial the respective number.
Pick up receiver or press the hands-free key  for hands-free mode. With a headset connected, you can also accept the call by pressing the ‘Headset’ key in the headset mode.
To end the call, return the receiver to the cradle or press the cancel key .
1. If you are already in a call, one of the line keys lights up (continuous light).
2. A call waiting tone indicates a second call is coming in. At the same time, a second line key flashes rapidly. Press the line key (next to the rapidly flashing LED), to accept the call.
3. You can now toggle between the calls, by directly pressing the “Line keys”. In doing so, the active call is indicated with a continuous LED light and the waiting call with a flashing LED light.
To end a call, press the cancel key  . Hanging up will end both calls.
| Line/call indicator functionality | Line/call status |
| Off | Line not in use or no call |
| Rapidly flashing indicator | Ringing |
| Continuous light | Connected |
| Slowly flashing indicator | Hold |
1. Press the Hold key to place the current call on hold  .
.
2. Then press the Transfer softkey. Now, dial the telephone number you would like to transfer to and press the Dial softkey. The first call is now on “hold”. The 6730i and 6731i feature a direct function key for transferring  , apart from that the process is identical.
3. Once you select the Transfer softkey or hang up, the call is transferred whether or not the party to whom you are transferring has already answered or not.
4. To transfer a call without answering it first, dial the extension to be transferred to directly.
- When a message is received the
 symbol appears in the display. To retrieve voice mail messages press the Voicemail softkey. The symbol appears along with the number of new messages (e.g. x4).
 - When prompted, enter the standard password (e.g. 1234) using your keypad.
- Then press 1 to listen to messages. After listening to the message press:
 symbol appears in the display. To retrieve voice mail messages press the Voicemail softkey. The symbol appears along with the number of new messages (e.g.
 7 to delete
5 to replay the message
6 to go to the next message
- To end, simply hang up or press the cancel key.
Mitel (Aastra) 6730i and 6731i
1. Call the first party.
2. Once the first party answers, press  . The current call is now placed on “hold”.
3. Call the second party and wait until the second party has been reached.
4. Pressing the key will now activate the three-way conference.
Mitel (Aastra) 6755i and 6757i
1. Call the first party. The display will show “Conference”.
2. After successfully connecting the calls, press the key next to “Conference” to start a conference call. The current call is now placed on “hold”.
3. Now, enter the telephone number for the second party and wait to be connected.
4. Press the key next to “Conference” again, to establish the Three-way conference.
The 6753i does not support 3-way calls. A conference call with more than three parties can easily be set up on the administration portal: Please refer to the administration portal manual.
1. Press the redial  key.
key.
2. Use the navigation keys and softkeys to browse the call list and dial the respective party/parties.
3. Press the line key or pick up the receiver.
1. Press the “Call list” key.
2. Select the desired type (missed calls, incoming calls, outgoing calls) (using softkeys and navigation keys).
If the telephone number of an incoming or outgoing call matches the one stored to a softkey or in the phone book, the call list displays this name and telephone number. Please refer to the administration portal manual for phone book set-up instructions.
To delete individual entries press the “Delete” key twice. Delete once + right navigation key deletes the entire list.
| Display | Description |
| 450-349-0438 | Indicates the call in the list was answered. |
| N MAR 04 3:30pm 2x | "N" indicates a new call. |
| XX new calls | The display indicates how many calls have been added to the list since last being reviewed. |
| Indicates a missed call in the call list. | |
| Indicates an answered call in the call list. | |
| Indicates a waiting call in the call list. | |
| Indicates an incoming, waiting call. | |
| John Doe +49891234567 June 8 2:41pm 2X | "2x" indicates this person phoned twice. The display indicates the date and time for the last of the calls. |
The Completion of Calls on No Reply (CCNR) creates a callback in case a person cannot be reached (e.g. the person is not on its desk or busy) at the moment.
To use this function, the CCNR function has to be enabled in the administration portal and in the phone extension. Click on the CCNR check box under Administration / Profile to activate the function.
Generating Callbacks
A caller generates automatic connection establishment within the private branch exchange (PBX) to a previously busy party (only internally). If the the other party cannot be reached, the caller is able to use the callback function. In order to activate the function, insert *5 into your key pad. An accoustic confirmation will finalize the activation. As soon as the other party is available again, its end device receives a callback generated by the PBX. As soon as the other party answers the callback, the PBX sends out a call to the initial caller and establishes the connection.
Erase Callbacks
If the callback is no longer needed, all call backs can be erased by entering the **5 code into the key pad. An accoustic confirmation finalizes the erase.
An overview of all function codes of the PBX can be found here.
No content available.

Program field keys freely programmable as function keys
Programme keys can be configured with the following functions via the administration portal (also refer to administration portal manual):
- Telephone number
- Busy Field Light (BFL)
- Intercom
- Function code
- Services
Function codes
Control codes allow direct access to the telephone system’s functions. The following codes apply:
| Code | Description |
| **## | Restart devices, only for snom devices! |
| #+n | Use outside line "n" to call the telephone number ("n" replaces the “0” otherwise required to access an outside line) |
| *1 | Start and end voice recording (if this function is enabled for the extension) |
| *10+profile number | Activation of the call forwarding profile |
| *11+TN | Permanent call forwarding to telephone number (TN) |
| **11 | Cancel permanent call forwarding |
| *12+TN | If not available, forward to telephone number (TN) |
| **12 | Cancel call forwarding if no answer |
| *13+TN | If busy, forward call to telephone number (TN) |
| **13 | Cancel call forwarding if busy |
| *14+TN | If not registered, forward to telephone number (TN) |
| **14 | Cancel forward if unregistered |
| *2+Speed dial | Directly dial the extension/telephone number via speed dial |
| *3 | Pick up the last call ringing in the pick-up groupe |
| *3+EXT | Pick up call coming in to the extension (EXT) |
| *490 | Activate call waiting |
| **490 | Deactivate call waiting |
| *5 | If busy, automatic callback activated |
| **5 | If busy, automatic callback deactivated |
| *55 | Specify primary device within a premium extension (Premium Package) |
| *72+nnnn1 | Call skill service nnnn |
| *73+nnnn1 | Call eFax additional costs will occur |
| *74+nnnn1 | Call time control nnnn |
| *75+nnnn1 | Call group nnnn |
| *76+nnnn1 | Call announcement nnnn |
| *77+nnnn1 | Call queue nnnn |
| *78+nnnn1 | Call conference service nnnn |
| *791 | *791 - Access voice mail for this extension with password *791158 - Access voice mail for extension 158, with the password for 158! *11*791 - Transfer your calls to your voice mail *11*791158 - Transfer your calls to the voice mail of the extension 158 |
| *792 | Access voice mail entering extension number, e.g. for remote enquiry |
| *80 | Activate intercom |
| **80 | Deactivate intercom |
| *80+EXT | Intercom to extension (EXT) |
| *84+nnnn1 | Become member of the queue with service ID nnnn |
| **84+nnnn1 | Leave queue with service ID nnnn |
| *85 | Echo extension |
| *86 | Block caller ID (CLIR) |
| *860 | Show main number as telephone number |
| **86 | Show telephone number incl.direct dial (CLIP) |
| *87 | Subscribe to Skill-set |
| **87 | Unsubscribe to Skill-set |
| *9+Project Number | Define a project number for outbound calls. (Note: The project number is only valid for the very next outbound call) |
| Function codes for conference rooms during an active conference. | |
| ** | Help |
| *2 | Activate or deactivate mute |
| *3 | Express your needs |
| *5 | Activate or deactivate mute of all participant |
| *6 |
|
| 1) nnnn is the four digit Service ID with leading zeros (0). For example, in a callgroup, IVR, eFax, etc. This means: is the Service ID "1", "0001" must be entered when entering the function code. |

For details on all commands regarding the programming function keys, please refer to the administration portal manual.

For details on all commands regarding the programming function keys, please refer to the administration portal manual.

For details on all commands regarding the programming function keys, please refer to the administration portal manual.
Old layout

New layout

For details on all commands regarding the programming function keys, please refer to the administration portal manual.
You have the option of protecting your telephone against improper use by locking its keypad. I.e. with the keypad locked, no outgoing calls can be dialled. However, the keypad lock can be deactivated at any time.
To lock your telephone, press the  key.In the list of options under item 7, select keypad lock. Confirm item 7 using display key Lock.
To unlock the telephone press the key again and enter your voice mail password. Confirm your entry with Execute. Your telephone is now unlocked.
To change the voice mail password:
Press the key 4.User password Current password Change password.
When accessing the voice mail system’s voice menu for the first time, you should also set up your personal voice mail
Access the voice mail system’s voice menu by pressing the voice mail softkey or by dialling the extension set up on the service site for accessing the voice mail system’s voice menu.
1. Then select “0 voice mail options” to set up your voice mailbox.
2. Now press “1” to record a message in the event you are unavailable.
3. Now, record your message and press “#” to end the recording.
4. Press “1” to accept the recording, “2” to replay the recording, and “3” to rerecord.
For more detailed information, please refer to the voice mail leaflet.
Accessing voicemail
1. Press the “Voicemail” programme key.
2. By selecting the extension set up on the service site for accessing voicemail.
On the administration portal, you can also set up voicemail messages to be emailed to you; please refer to the voicemail leaflet.
No content available.
The process for viewing a telephone’s IP address is identical for all Mitel models.
1. Press the  key to access the list of options.
2. Using the navigation keys select “Telephone status” under item 3.
3. Selecting “IP/MAC addresses” under item 1, displays the telephone’s IP and MAC address.
The telephone’s IP address is required to configure the CTI client for example.
Where can you get help?
The information you found in the manual for this product does not answer your question?
We will be happy to help you. If you have technical problems, please open a ticket at service.deutsche-telefon.de - this is the quickest and most efficient way for us to help you.
If you need help immediately, please call us after creating the ticket and give us the ticket number. The technical service can be reached free of charge at the hotline number 0800 5802008.
If you have general questions about our products, e.g. about availability, test positions or similar, please use the contact options given at https://www.deutsche-telefon.de/kontakt.html.